• Skip to primary navigation
  • Skip to main content

Firefly Meadows Farm:

  • Our Story
  • Products & Pricing
    • Raw Honey
    • Green Cleaning Supplies
  • How to Purchase
  • Buy Honey Bees
  • Queen Rearing Calendar
  • Connect
  • Blog
  • Shop
  • Cart

Josiah

Why Your Queen Cells Keep Getting Torn Down in a Queenright Finisher

April 28, 2026 by Josiah Leave a Comment

A field discovery about queen pheromones and queenright cell finishers that most beekeeping resources miss


If your queen cells keep getting destroyed in a queenright finisher, you’ve probably blamed your grafts, the timing, the dearth, or your nurse bee ratio. Most beekeepers do. You may have even tried starting fewer cells, thinking a lighter load would help. It doesn’t. But if you have plenty of nurse bees per cell and you’re still losing cells, there’s a good chance the real problem is something almost nobody talks about: your colony is too small to dilute queen pheromones sufficiently.

In 2025, I figured this out the hard way while grafting from late April through July, roughly 12-14 rounds of troubleshooting, and eventually connecting dots I couldn’t find connected anywhere in the beekeeping literature.

What Happened: ~20 Cells Started, 0-5 Finished

I was using Bob Binnie’s queenright starter/finisher method, which he runs in double deep 10-frame colonies. I wanted to adapt it for my 8-frame medium equipment. My setup, a double 8-frame medium, is roughly half the volume and bee population of a double deep. I figured I’d just start fewer cells and that the system would work great.

That didn’t work. I started around 20 cells each week and finished 3-5. Sometimes zero. And the cells that did survive were small. Cell starts looked great when I moved them from the starter to the finisher and often were capped, but then torn down.

The puzzling part: I had plenty of nurse bees relative to the number of cells I was trying to finish. By every standard measure, I should have had enough. Something else was going wrong.

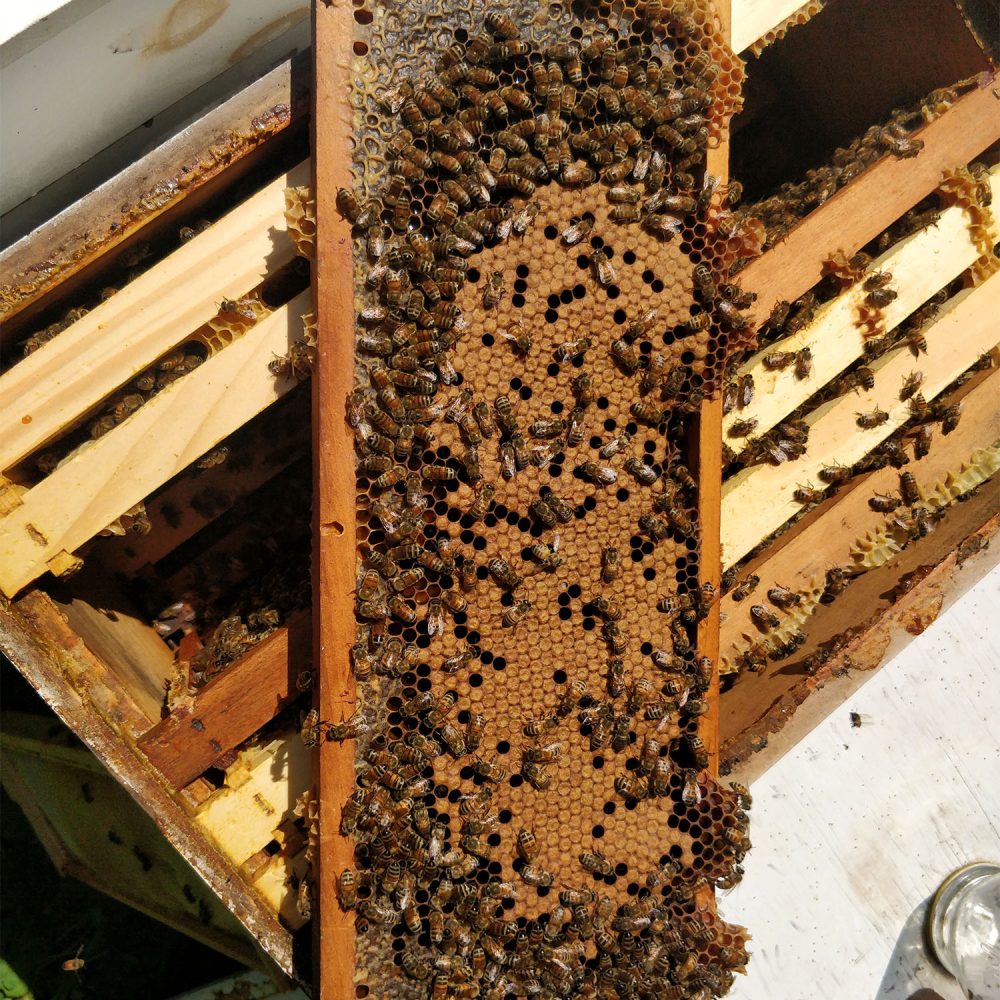
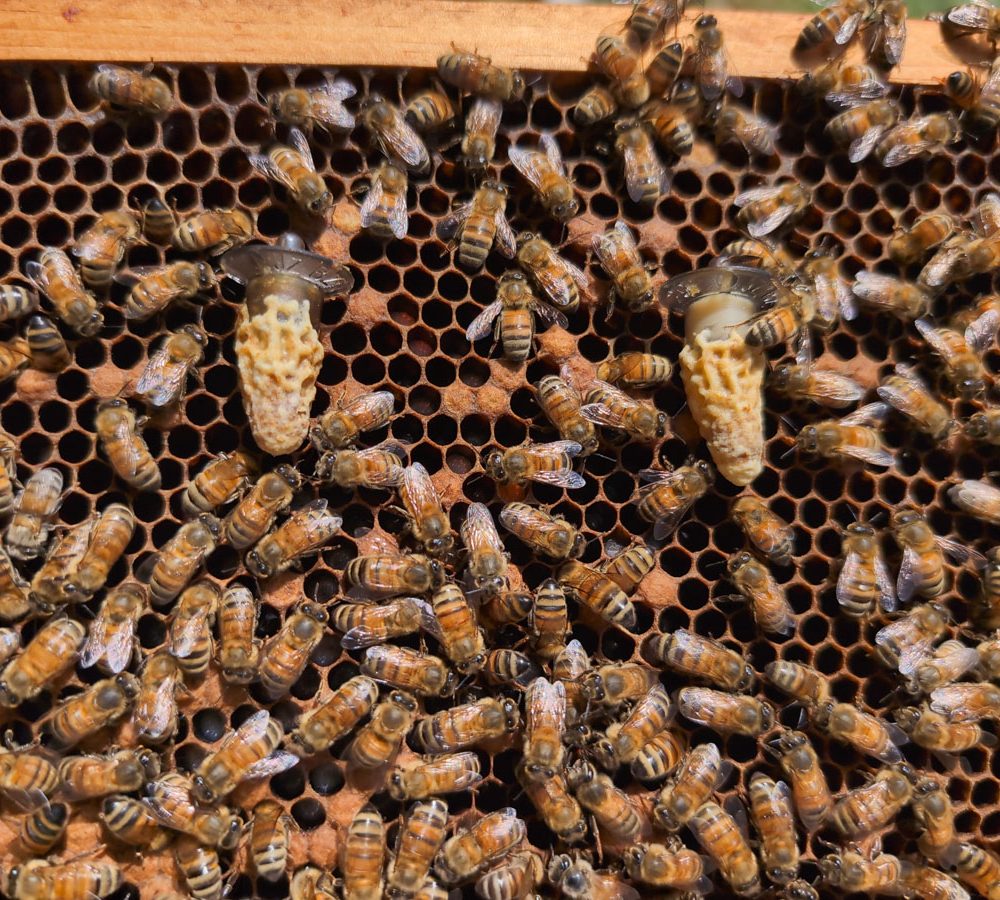
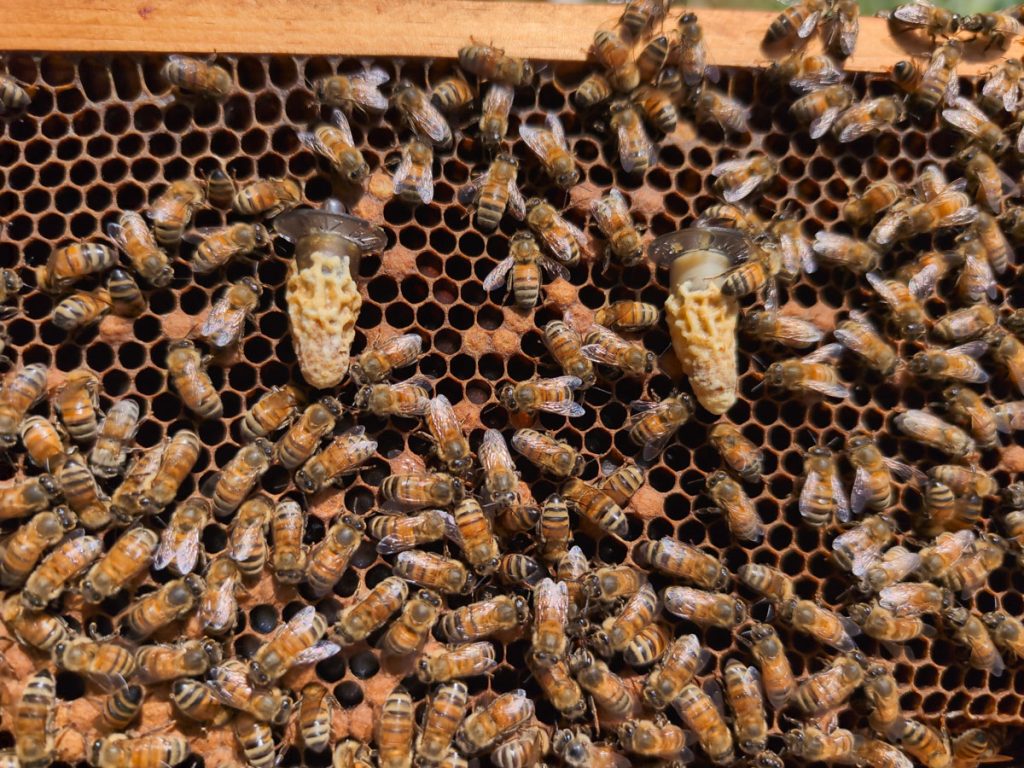
One early round gave me a particularly clear diagnostic: I grafted 16 cells, left the colony queenless for about 18 hours or so, and then made it queenright by sliding the queen below an excluder, timing that falls squarely within the 18-24 hour window often cited as ideal. On harvest day, the cells were gone. The cell bar frame was webbed over with burr comb. Buried in that comb was one JZBZ cup containing a single queen cell that looked much smaller than it should.

The 18-hour window was probably fine. The problem was that my colony, two 8-frame mediums, was too small to suppress QMP in the upper box even with an excluder in place. The bees above the excluder never fully committed to finishing, and when pheromone levels didn’t stay low enough, they abandoned the effort entirely.

Two Variables, Not One

Most queen rearing resources frame the queenright finisher around one variable: nurse bee density. Enough nurse bees means enough royal jelly means good queens. That’s true, but it’s only half the picture.

In a queenright finisher, you actually have two independent variables:

  1. Queen pheromone dilution determines whether cells get accepted in the first place
  2. Nurse bee density determines how well cells are provisioned once accepted

Variable #1 must be satisfied before variable #2 even matters. You can have a high density of nurse bees and still lose every cell if the colony isn’t large enough to dilute QMP below the acceptance threshold.

The correct sequence: first ensure total colony population is above the threshold, then optimize for nurse bee density. Dense clustering around the cell zone also helps maintain the tight thermal envelope (around 34-35°C) that developing queen cells require, which is another reason why population matters beyond just nurse bee count.

The Real Reason Queen Cells Get Destroyed: Queen Pheromone Dilution

Queen Mandibular Pheromone, QMP, is the chemical signal the queen uses to tell her colony she’s present and healthy. It spreads primarily through the colony bee-to-bee via trophallaxis (food sharing), antennation (antenna-to-antenna contact), and cuticular touch. Workers pick it up from the queen and pass it along through the colony like a chain.

Here’s what that means for a queenright finisher: the larger the colony, the more bees the pheromone is shared among, and the lower the per-bee concentration across the whole colony. In a large colony, QMP gets diluted across tens of thousands of bees. Each individual bee carries a weaker signal, not because of where they are in the hive, but because the total pheromone load is spread across a much larger population. Think of it like diluting food coloring in water: the color doesn’t disappear at the edges, the whole bucket just gets lighter. Every bee in the colony shares in that diluted signal, including the ones tending your grafted cells.

In a small colony, the same pheromone output from one queen is shared among far fewer bees. Each bee carries a stronger dose. The message is clear: there’s a queen here, we don’t need more queens. And so they tear down your cells.

This isn’t a new concept in bee biology. It’s the same mechanism that triggers swarming. As a colony grows, QMP per bee drops below a threshold and the colony begins building swarm cells. The science is well established. It just hasn’t been clearly connected to the practical problem of queenright cell finishing.

And here’s what makes this especially tricky: queen cell inhibition isn’t a linear scale. It’s a threshold, a cliff, not a slope. Above a certain QMP concentration per bee, cells get torn down. Below it, they get accepted. When I halved my colony size, while I proportionally reduced QMP levels, I nearly eliminated the number of cells that were finished. Cell production fell off the cliff entirely. Plenty of nurse bees per cell, zero results. This is why the standard advice to “use a strong colony” is correct but incomplete. A colony that’s merely good isn’t the same as a colony that’s large enough. There’s a minimum population threshold below which a queenright finisher simply doesn’t work, regardless of how healthy or well-provisioned the colony is. Starting fewer cells won’t help either; the population requirement doesn’t scale down with your cell count.

Unexpected Proof: Queenright Finishers That Swarmed

While troubleshooting, I noticed something odd: a few of my small colonies worked better as finishers than the others. I figured out which ones through trial and error, and then watched them swarm shortly after.

That’s not a coincidence. A colony on the verge of swarming is already pheromone-depleted: the queen’s QMP output is no longer sufficient to suppress swarm behavior across a large population. Those same colonies were below the QMP threshold for suppressing queen cell acceptance too. Both behaviors, good cell finishing and imminent swarming, had the same root cause: low QMP per bee.

I was accidentally selecting for pre-swarm colonies every time I found a small finisher that worked. The success was real, but unstable and unpredictable, and it came with the cost of losing the colony to swarming. Understanding the mechanism helped me build a reliable system instead.

How Big Does a Queenright Finisher Need to Be?

The standard Bob Binnie queenright starter/finisher setup uses 2 x 10-frame deeps, and it works reliably. That colony size appears to be approximately the minimum threshold for consistent cell acceptance in a queenright finisher.

Equipment equivalencies:

  • 2 x 10-frame deeps = minimum reliable threshold
  • 4 x 8-frame mediums ≈ equivalent volume and population

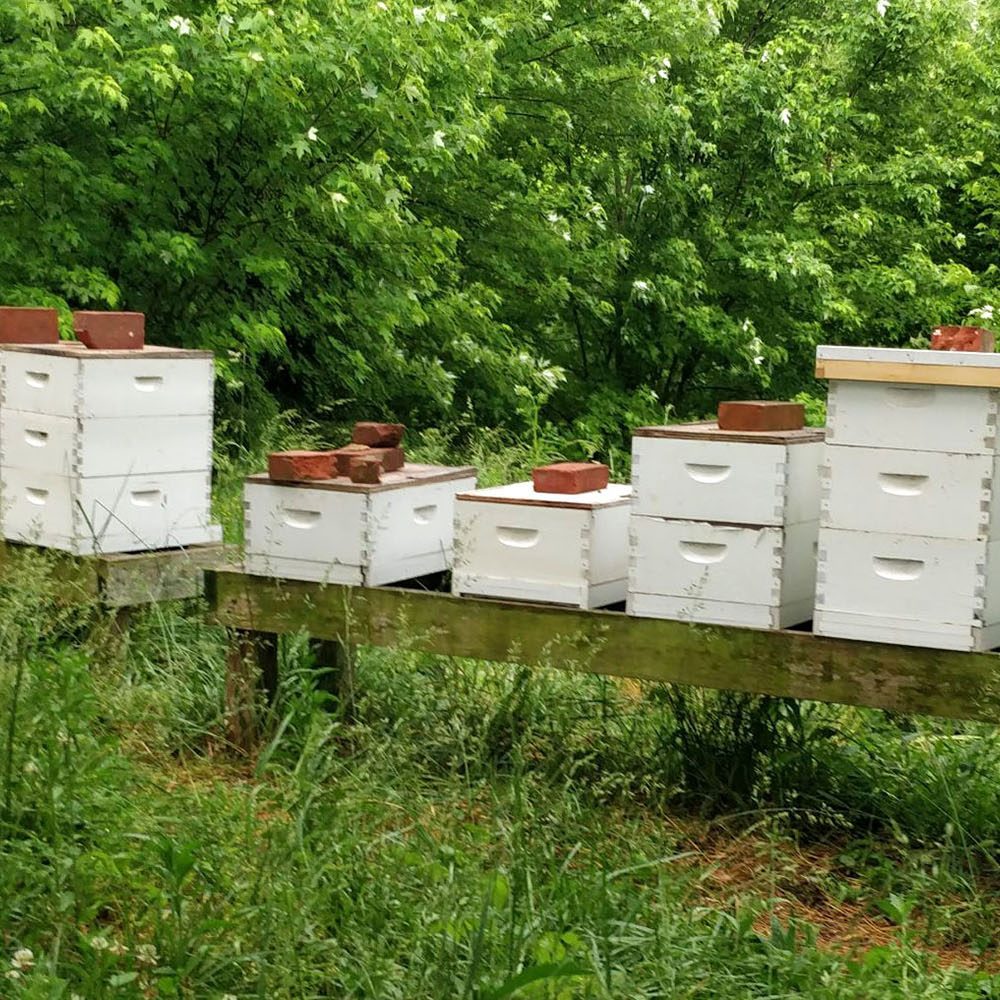
My finisher colonies now run 5 x 8-frame medium boxes or more, which exceeds the minimum and likely contributes to the 80%+ acceptance rate I now see consistently.

One important clarification: it’s not about distance from the queen. QMP spreads primarily through bee-to-bee contact. What matters is the total number of bees across the entire colony, not how many boxes separate the queen from the cells. A tall colony with sparse population could perform worse than a shorter but densely packed one.

Can You Use 8-Frame Mediums for Queen Rearing? Yes, With the Right Setup

If you’re using 8-frame medium equipment and adapting Binnie’s method, the key is to match the total colony volume, not just replicate the box count. Two 8-frame mediums do not equal two 10-frame deeps

To recreate the Binnie volume in 8-frame mediums:

  • Use 2 boxes below the excluder + 2 boxes above (with cells in the top box)
  • Or use my approach: a separate dedicated finisher colony of 5+ boxes

The separate finisher approach has a practical advantage: you’re not digging into a massive colony to add cells. You’re just adding your grafted cells to the top box of the finisher, which is low intervention, low disruption, and easy management.

My Current System: From 0-25% to 80%+ Acceptance

Starter: Double 8-frame medium. The day before grafting, I insert a double screen board between the two boxes, isolating the queen to the bottom box and making the top box queenless. This creates queenless conditions for cell acceptance without weakening the colony. After grafting and allowing 24-48 hours for cells to be started, I remove the double screen board and replace it with a queen excluder, converting the colony back to queenright.

Finisher: 5 x 8-frame medium boxes with a laying queen, queen excluder, then one additional box on top containing the grafted cells, pollen frames, and a feeder.

The purpose of the queen excluder is to prevent the queen from reaching the cell box and destroying the cells herself. A queen’s instinct is to eliminate rival queens, and she’ll tear down queen cells without hesitation. The excluder keeps her below while workers move freely above to tend the cells. Keeping her from laying in the cell box is secondary; keeping her away from the cells entirely is the point.

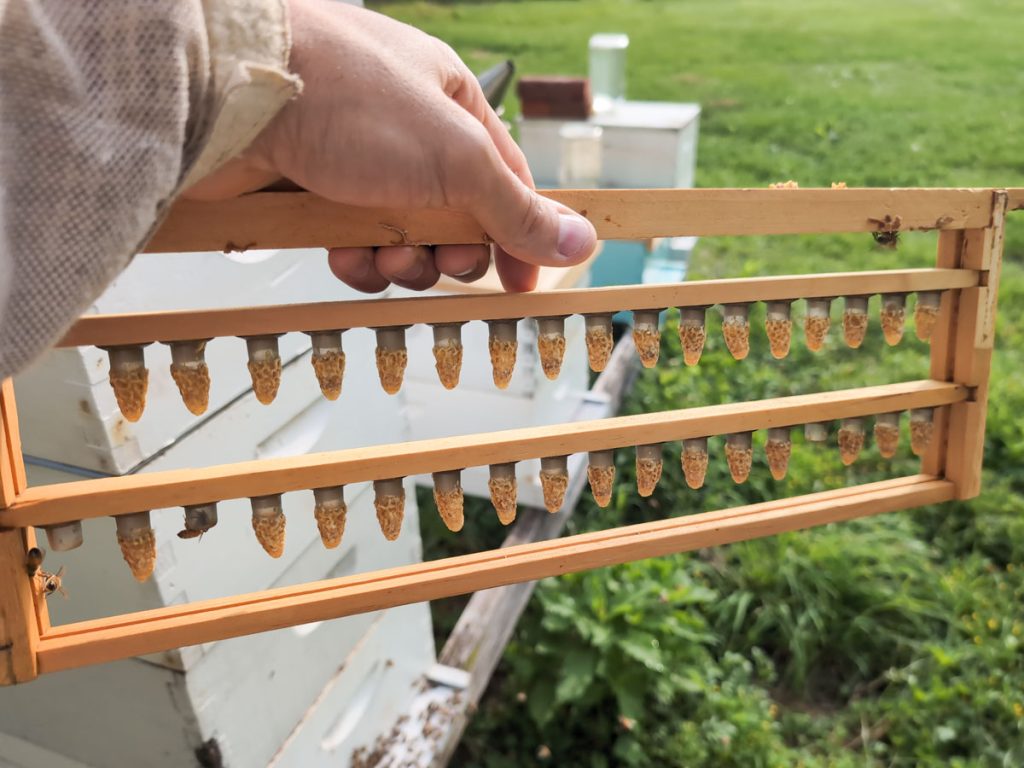
Cells started in the starter colony are transferred to the large queenright finisher after 36-48 hours, after the cells have had time to be accepted and begin drawing out. This two-stage approach is deliberate: the queenless top box gives cells a strong start, with no pheromone suppression at all. The queenright finisher then provides stable, long-term conditions for the remainder of development. Each environment does what the other can’t.

Result: acceptance rates jumped from 0-25% to consistently above 80%.

What If Your Finisher Still Isn’t Strong Enough?

If you’re running at the minimum threshold (such as double deeps), a queen with a particularly strong pheromone profile can sometimes push a borderline colony over the edge into cell rejection. The fix is to boost the population further. Shake in frames of nurse bees from a strong colony. Open brood frames work best to shake from as they contain a higher percentage of nurse bees. You can also add capped and emerging frames to your finisher each week to keep the population of young bees boosted. Remember: the queen’s pheromones spread primarily through bee-to-bee contact. More bees means more dilution points in that contact chain.

Don’t be tempted to just start fewer cells in a borderline finisher. The threshold effect means a slightly-too-small colony won’t finish 5 cells any better than 20. The population requirement doesn’t scale down with your cell count.


The Downstream Damage: Why Torn-Down Cells Are Only the Beginning

When cells get torn down, the most common response is to pull them immediately after capping and put them in an incubator. It solves the teardown problem but introduces new ones. Freshly capped cells are fragile; the pre-pupa is still feeding briefly before spinning its cocoon, and rough handling can dislodge it. More importantly, an incubator cannot replicate what bees do to capped cells. Workers transmit vibrational signals through the comb that influence queen development, and colony temperature regulation is more precise and responsive than most incubators. Experienced queen rearers consistently report that queens emerging in mating nucs outperform queens emerged in incubators.

Queen quality at emergence also directly affects mating success. A well-provisioned queen from a well-tended cell is larger, heavier, and has more ovarioles, traits that correlate with drone attractiveness, flight capacity, and sperm storage. The research is clear: better cell, better queen, better odds of returning from the mating flight.

If you pulled cells into an incubator early because of teardowns, you got hit twice: poor finishing in the colony and suboptimal development in the incubator. The root cause was colony size, but the consequences rippled all the way to your mating success rates.


You’re Not Alone: The Beesource Thread Graveyard

This problem is not rare. A search of Beesource, turns up dozens of threads from beekeepers describing exactly this experience: cells accepted, cells capped, cells torn down. Fruitless troubleshooting. Workarounds involving incubators. No clear answer.

A few examples:

In one thread titled “Queen Cells being torn down in finisher” (7,000+ views), a beekeeper using a strong double-deep queenright finisher describes losing cells consistently 2-4 days after capping, despite good acceptance and coverage. The community’s best answer: buy an incubator.

In another thread, a beekeeper ‘jonboar’ reports running a queenright method: 19 of 20 cells capped and beautiful at day 7. By day 10, torn down to 6. Next batch, same result. Again, no mechanism identified.

In perhaps the most striking thread, “Bees tearing down queen cells” (8,800+ views, 2020), a beekeeper has tried every variation: starter/finisher, queenright finisher, queenless finisher, Cloake board, shaking in bees until near-swarming conditions. Still loses cells down to 3-6 every time. The community offers suggestions about nurse bee ratios and excluder failures. Nobody mentions total colony population as a QMP dilution problem.

What’s notable is that experienced beekeepers in these threads do understand that queenright finishers need to be strong and populous. This is implicit in every recommendation to use “a very strong hive” or “solid boxes of bees.” But the reason why colony size is the critical variable, that it governs QMP concentration per bee, not just nurse bee availability per cell, is never stated. You can do nearly everything correctly, but if your queenright finisher is not big enough the QMP pheromone will be too high and cells will get torn down or never finished.

If you’ve spent a frustrated season losing cells and couldn’t figure out why, you’re in good company. The frustration is common. The explanation, apparently, was not.

I haven’t seen this explained this way anywhere in the beekeeping literature, though the underlying science is well established in swarm biology. If you want to dig deeper into queen rearing timing and management, my queen rearing calendar includes the ‘Josiah Garber’ Method, a variant of the Binnie approach adapted for 8-frame medium equipment with some changes for my preferences.


FAQ: Queenright Cell Finisher Problems

Why are my queen cells being destroyed in a queenright finisher? Beekeepers commonly blame grafting technique, timing, dearth conditions, nurse bee ratios, or excluder failures. But the most likely cause, especially if you have adequate nurse bees, is that your colony is too small to dilute queen mandibular pheromone (QMP) below the acceptance threshold. Workers receiving a strong QMP signal interpret it as “we already have a queen” and tear down introduced cells.

How big does a queenright finisher need to be? The Bob Binnie method uses 2 x 10-frame deeps, which appears to be approximately the minimum reliable threshold. In 8-frame medium equipment, aim for at least 4 boxes total (roughly equivalent volume). More is better; 5+ boxes gives more margin.

Can I use a small colony as a queenright finisher? Generally no, not reliably. Small colonies concentrate queen pheromone among fewer bees, keeping the per-bee dose above the threshold that suppresses cell acceptance. Occasional success in small colonies is usually a sign the colony is pheromone-depleted and likely approaching a swarm.

Does distance from the queen matter in a queenright finisher? No, not directly. QMP spreads primarily through trophallaxis, antennation, and cuticular contact between workers. What matters is total colony population, not how many boxes separate the queen from the cells.

Why do you use a queen excluder in a queenright finisher? Primarily to prevent the queen from physically destroying the cells. Queens instinctively eliminate rivals, including developing queen cells, and will tear them down given the chance. The excluder keeps her body below while workers pass freely above to tend the cells. Preventing her from laying in the cell box is a secondary benefit, not the main reason.

What’s the difference between a queenless starter and a queenright finisher? A queenless starter has no queen, so there’s no pheromone suppression and cells are started readily, but the queenless state degrades quickly. A queenright finisher maintains a stable colony long-term but requires sufficient population to dilute QMP. Using both in sequence (start queenless, finish queenright) combines the advantages of each.

Filed Under: Uncategorized

My Journey Back from Lyme Disease: What Actually Worked

October 29, 2025 by Josiah Leave a Comment

Deer Tick on Skin

In case it helps someone, I thought I’d share part of my journey with Lyme Disease. I’m specifically focusing here on what I believe was most helpful in restoring my health.

I won’t claim I’m 100% restored, but I’m dramatically better than I was. My guess is the Lyme is still there in the background.

I don’t think my success came from killing Lyme with drugs or herbs. Rather, I believe I had to strengthen my immune system, which brought my Lyme disease into remission.

What I Think Made the Difference

Addressing Mold
I fixed leak issues in our home and installed ERV (Energy Recovery Ventilation) systems. This approach was much cheaper and possibly more effective than full mold remediation. I also used a Push/Catch protocol to mobilize, then remove mycotoxins from my body. I continue to use this protocol much less aggressively to support overall health and remove many other types of toxins from my body.

Nutrition Overhaul
I switched to a low-carb, high-meat (primarily grass-fed beef), whole foods diet with no gluten. I mostly avoid “gluten-free” products too, and I’ve minimized snacking between meals. Note that my diet was relatively good before this journey, but I’ve improved it over the last couple years.

Sleep and Stress Management
I now prioritize sleep and rest while attempting to minimize stress. Easier said than done with a young family, but I do a much better job of it than I used to.

Moderate Exercise
I exercise moderately 2-3 times a week for a total of 2-3 hours. I focus on two days of zone 2 heart rate running (conversational pace) and one day of basketball or higher intensity running.

Targeted Supplementation
Based on my genetics and testing what works for my body, I take: B12 (Hydroxy-Adeno), B6 (extremely low dose since it can be dangerous), Folinic Acid, Probiotics (Bifido & Rhamnosus), and Ornithine. I am very cautious about supplementation as I believe supplements can be dangerous. I have seen certain supplements cause problems for me and tend to stick to lower doses. I like Chris Masterjohn’s work on supplements. He is very cautious in his approach as well.

Sunshine and Vitamin D
I don’t like to supplement with the synthetic form of Vitamin D so I try to get plenty of sun exposure on exposed skin when possible. During the summer months I don’t need to make a special effort. However, I schedule ‘Vitamin D Sessions’ from October 1 to November 20 and January 20 to March 30th. During these sessions, I try to spend time in the sun with as much exposed skin as I can during the peak sun hours of the day. Between November 20 and January 20th, producing Vitamin D from sun exposure is not possible so I supplement with a high quality cod-liver oil supplement.

Bee Stings
I am a beekeeper who gets stung regularly during the beekeeping season (March through September). Many people report relief from Lyme by using bee sting therapy. I don’t know if this has been helpful or not, but I certainly get my share of bee stings!

Final Thoughts

My most recent test results show all but one of my five Lyme and co-infections are in remission. I am so grateful to be feeling dramatically better. Previously, I felt like I was dragging myself through life which is a terribly difficult way to live.

Blessings on the journey to everyone who is still stuck in that difficult place of living with the pain of Lyme disease. I wish you success and healing!

I want to thank Tracey Long of Big Picture Health, my wife Carmen, and my friends and family who supported me on this journey.

Feel free to leave a comment or reach out if you have any questions.

Filed Under: Uncategorized

Spring Beekeeping Q&A: Feeding, Mites, Swarms, and Supers

March 29, 2025 by Josiah Leave a Comment

I recently answered a few spring beekeeping questions from a friend, and I thought I’d share them here for others who might be wondering the same things. These are based on what I’m doing right now in my own apiary.


Should I be feeding sugar water right now?

If your bees don’t have enough stored honey to make it to the dandelion bloom, it’s a good idea to feed them so they don’t starve and die. I’m currently (March 29th) feeding any hive that has very little stored honey and is in danger of starving out, but the dandelion bloom will start shortly.

I use a 1:1 sugar water mix and trickle feed it. My rule of thumb for liquid feeding is this: daytime temperatures should be over 50°F and nighttime temperatures should stay above 32°F.


When do you do oxalic acid vapor (OAV) treatments?

OAV can be done any time of year, but the most effective time is in late fall or early winter, when the bees are broodless. That’s because oxalic acid only kills mites on adult bees—not those hiding under brood cappings.

I did my first 2025 treatment just yesterday. If you treat during times when brood is present, plan to do multiple rounds—about once every 5 days for 3–5 treatments—to catch mites as they emerge.

It’s also helpful to treat on milder days. If bees are tightly clustered in the cold, the vapor doesn’t spread as well. Ideally, treat when temps are around 50°F or warmer, or at least on a warmer-than-average day.


What do you do to prevent swarming?

I use a few different strategies:

  • Equalizing hives: I aim for a target number of brood frames depending on the date. For example, right now (March 29th) I’m targeting seven medium frames of brood. During inspections, if a hive has more brood than my schedule calls for, I move the extra frames to hives that are behind.
  • Splitting hives: Splitting is one of the best ways to prevent swarming. It’s essentially an artificial swarm—I remove the queen along with some brood and honey frames, and place them in a new hive (either nearby or in a new location). I then give the original hive one or two queen cells to raise a new queen. If you don’t have any cells, let the bees build their own.
  • Adding space: I stay ahead of the bees by adding another box before they get overcrowded. Giving them room to grow helps reduce swarming pressure.

When do you add supers?

This is something you learn to get a feel for over time. The key is to add a box when the bees need more space.

I base that decision on a few things:

  • How full the current box is with bees
  • How much brood is about to hatch
  • Whether there’s enough open comb for storing nectar, pollen, and for the queen to lay

If a box is jam-packed with bees and has little empty space, it’s time to add another box.

Filed Under: Uncategorized

Brood Factories: Unlocking the Secrets to Healthy, Productive Apiaries

June 11, 2024 by Josiah 2 Comments

Bee Hives on Stand

My notes and thoughts from Michael Palmer‘s Presentation on Brood Factories

In beekeeping, efficient resource management is key to thriving hives. Michael Palmer introduces the concept of brood factories—a game-changer for any apiary. This strategy can transform how you support and expand your bee colonies. Here’s a deep dive into the essentials of brood factories and how they can elevate your beekeeping practice.

What is a Brood Factory?

A brood factory is a hive specifically managed to produce surplus brood and other resources. Think of it as the powerhouse of your apiary, consistently supplying brood to boost other colonies or start new ones. This approach ensures your bees are always ready to tackle the challenges of the season. Michael’s focus is on having a large number of laying queens in the apiary.

Flexibility in Hive Types

Any beehive style can be used as a brood factory, as long as you stick to the same frame size across your apiary. This compatibility is crucial for easy transfer of brood, honey and pollen frames to other hives.

Strategic Uses of a Brood Factory

Brood factories are versatile and can be deployed in various ways to strengthen your apiary:

  1. Boosting Weak Colonies: Transfer frames of hatching brood to weaker hives to boost them.
  2. Boosting Honey Production: Supplement honey-producing hives with additional brood at the right moment to maximize their workforce and yield. This is a highly effective way to produce honey during a flow.
  3. Boosting Cell Builders: Provide emerging brood to cell builders, ensuring strong cell builders that build healthy and productive queens.
  4. Starting Nucleus Colonies: Use the extra brood to create new nucleus colonies to expand your apiary or for more sustainability.

The Power of Bee Bombs

One of Palmer’s standout techniques is the “Bee Bomb.” He places a box of capped or emerging brood at the bottom of a slow or weak hive, triggering rapid population growth. This sudden boost can revitalize a struggling colony. Note that he says not to do this to a hive that need to be requeened or has a legitimate problem, but rather to boost hives that struggling to get going.

The Mechanics of Brood Management

To manage a brood factory effectively, follow these key practices:

  • Frame Harvesting: Every 10-14 days take a couple frames of brood from each resource hive. Remove enough brood to prevent swarming but not so much that it slows down the hive’s overall growth.
  • Empy Frame Placement: Place empty frames of comb or foundation in the center of the brood nest, surrounded by existing brood. This encourages the queen to lay more eggs, expanding the brood nest.
  • Queen Spotting: Always make sure you don’t accidentally remove the queen when taking brood frames.
  • Honey Management: Take some honey frames from the brood factory if needed to provide space for nectar. This prevents the hive from shrinking the brood nest when it backfills with honey.

Creating Nucleus Colonies

When setting up nucleus colonies (nucs), it’s crucial to balance the mix of resources:

  • Include a frame each of honey, mixed brood, capped brood, and empty comb.
  • Avoid using all capped brood; mixed brood (with both capped and open cells) is better for holding bees, ensuring they stay and nurture the new colony.

Seasonal Adjustments

As the season ends, it’s important to prepare the brood factories for winter:

  • In the fall scale back each brood factory to 3 or 4 frames of brood to focus on building up for winter.
  • Maintain a smaller hive size going into winter for easier management.

Managing Varroa Mites

Varroa mites are a persistent threat, but brood factories offer a strategic advantage:

  • Since you frequently remove sealed brood from brood factories, you can delay mite treatments slightly.
  • However, prioritize treating the hives that received brood from the factory, as these are more likely to have increased mite loads.

Preparing for Winter Feeding

Winter preparation is crucial for hive survival:

  • Assess and mark each hive based on its food stores.
  • Start feeding as soon as the fall nectar flow ends, typically when you no longer smell goldenrod curing in the hives.
  • Early feeding ensures the bees have ample stores to make it through the winter.

Michael’s Seasonal Playbook

Palmer’s approach to brood factory management throughout the year is straightforward:

  • Spring: Focus on building up the colonies’ strength.
  • Summer: Harvest brood for cell building and gradually reduce colony size to prevent swarming.
  • Fall: Create nucleus colonies and prepare the brood factories for winter.
  • Winter: Maintain the brood factories as smaller, manageable units ready to ramp up in the next season.

My Thoughts (Josiah)

The success of brood factories lies in maintaining the right hive size. Colonies thrive when they’re not too small or too large. Regularly removing frames of brood and honey keeps the hive in that sweet spot, allowing for continuous growth and quick recovery from resource extraction.

For my apiary, using 8-frame medium hives, I plan to scale back to one box in the fall as this size of hive has overwintered very well for me in the past. I envision setting up hive stands where production hives are at the corners and brood factories are positioned between them. This setup should streamline management and ensure easy access to resources when needed.

Final Thoughts

Brood factories are a powerful strategy in beekeeping, providing a flexible and efficient way to manage hive populations and resources. By adopting Michael Palmer’s methods and tailoring them to your apiary, you can enhance the health and productivity of your bee colonies, ensuring a healthy and thriving beekeeping operation.

Filed Under: Uncategorized

The Carnivore Diet & Anxiety

July 21, 2023 by Josiah 14 Comments

Man eating meat at a table, anxious emotion.

Introduction

The carnivore diet has gained popularity in recent years, with proponents claiming various health benefits. However, some individuals on the Carnivore Diet may experience anxiety and other negative symptoms such as feeling of being wired and tired, or even severe insomnia. In this blog post, I’ll share my personal experience with anxiety on the carnivore diet and a theory on why this happens to some people. I’ll also provide some ideas for successfully navigating the carnivore diet in a way that minimizes negative symptoms like anxiety and insomnia.

While I’m not a medical professional, I hope this information sparks a discussion and helps shed light on the potential role of glutamate in causing anxiety. Please comment with any ideas, corrections or insights that you have.

My Personal Experience with The Carnivore Diet and Anxiety

Curiosity led me to test the carnivore diet during the initial Covid-19 lock-downs. Social gatherings were limited, sparing me the awkward conversations about my unique dietary experiment of consuming only animal foods.

However, soon after starting the diet, I encountered unexpected negative effects. Anxiety, and a constant state of being wired replaced the calm I had hoped for. Sleep became elusive, leaving me tired and wired upon waking, reminiscent of the over stimulation caused by excessive caffeine intake. As weeks went by, the situation worsened, leading me to halt the experiment after three weeks.

Because my diet primarily consisted of grass-fed beef, tallow, eggs, and some dairy—a fairly standard carnivore diet—I decided to search for explanations for these symptoms. I eventually developed the following glutamate theory, and I discovered that many others had similar experiences of anxiety on the carnivore diet.

The Glutamate/GABA Balance – Anxiety and calm

The theory I am considering revolves around the balance of glutamate and GABA, important neurotransmitters in the brain. Glutamate is an excitatory neurotransmitter, while GABA is a calming neurotransmitter.

In the past I had done getnetic testing. After reexamining my genetic SNPs, I discovered significant polymorphisms in the GAD1 genes, responsible for converting glutamate to GABA. I suspect individuals with these polymorphisms may struggle more with the carnivore diet due to the higher glutamate levels in many of the foods which are commonly consumed.

An imbalance with high glutamate and low GABA has been associated with various problems, including sleep disturbances, increased blood glucose levels due to elevated cortisol, psychiatric disorders like anxiety and OCD, migraines, diabetes, and neurological conditions.

If you want to know if you have any GAD1 SNPs, consider checking using tools like the Nutrahacker complete mutation report.

Examining Glutamate Content In Foods

To further investigate, I took some time to compile a list of common carnivore and non-carnivore foods and their glutamic acid (glutamate) content per 100 calories. Not surprisingly, many of the foods I was consuming on the carnivore diet were high in glutamic acid. Interestingly, many of the carnivore foods recommended by the carnivore community to alleviate the anxiety, wired/tired problem, such as fat, eggs, butter, and cream, had lower glutamic acid content. Incorporating more of these foods moderately improved my symptoms. Meats like fish, turkey, shrimp, beef, and poultry tend to be higher in glutamic acid.

I find it interesting to consider the staple diets of various cultures before the advent of Western processed foods. It appears to me that even cultures whose diets were closest to the modern carnivore diet consumed foods that could offset the intake of high-glutamate foods. Take, for instance, the Inuit; although their diet predominantly consisted of animal foods, they consumed a significant amount of animal fats, which are much lower in glutamate compared to muscle meat. This may have helped balanced their consumption of high glutamate foods. Another example to consider is the Maasai. While their diet was predominantly meat-based, it also included a substantial amount of milk, which has significantly lower glutamate levels.

I will include the charts of glutamic acid in foods at the end of this post. However, it’s important to note that some publicly available databases may have slight disagreements, making the information not entirely precise. Nevertheless, the charts should provide a good idea of the types of foods that have the highest glutamic acid content. This will allow you to experiment with lower glutamate carnivore foods to see if it helps to reduce your anxiety and insomnia.

The Impact of Free Glutamate

It’s important to understand the concept of “free glutamate.” Glutamic acid converts into free glutamate, which is easily absorbed and can act as an excitatory neurotransmitter. Cooking and aging increase free glutamate levels. Slow cooking, in particular, seems to be problematic, but even aged, uncooked meat can have high levels of free glutamate. Aging beef enhances flavor and tenderness but unfortunately increases free glutamate. Additionally, if you thaw meat in the fridge before cooking, it further elevates free glutamate levels. Fatter cuts of meat have lower glutamate levels, as fat has very little glutamate. This might explain why some people report feeling better on higher-fat cuts of conventional, grain-fed meat.

Considering Glycine

Glycine is often recommended to balance the consumption of muscle meats which are high in Methionine. However, from my research and personal experience, glycine may exacerbate the effects of a high glutamate/GABA imbalance. If your glutamate/GABA ratio is already high, glycine might intensify the excitatory effects of glutamate. Some argue that this excitotoxicity also leads to brain cell death. Foods high in glycine include muscle meats, while fat, butter, cream, and dairy tend to be lower in glycine content. In general the patter is that foods high in glutamate are also hig in glycine.

Ideas for Balancing Glutamate Levels

  1. Mind Your Diet: Consume more low glutamic acid foods and less high glutamic acid foods. For more information, refer to the charts provided at the bottom of this post. The foods toward to bottom of the list are important to focus on eating if you are dealing with anxiety.
  2. Cooking and Aging: Reduce your intake of slow-cooked and aged meats. Opt for rare-cooked meats since cooking and aging can raise free glutamate levels. Inquire with your butcher about the duration of meat aging before butchering and their aging methods.
  3. Exercise: Engaging in regular physical activity may help reduce glutamate levels in the brain.
  4. Eat More Fat: Incorporate healthy saturated animal fats into your diet, as they have lower glutamic acid levels.
  5. Front-load Glutamate Consumption: Consume glutamate-rich foods earlier in the day rather than towards evening. This may help you avoid the overstimulating effects of glutamate when it’s time to sleep.
  6. Prompt Meat Cooking: Minimize the time meat spends in the fridge before cooking to avoid increasing free glutamate levels.
  7. Moderate Bone Broth Consumption: Avoid long-simmered bone broth, which may contain higher glutamate and glycine levels.
  8. Exercise Caution with Supplements: If you are prone to high glutamate levels, avoid those containing glycine, such as Magnesium Glycinate, TMG (Tri-Methylglycine), Betaine, Collagen, or any supplements bound to glycine (Check for glycinate, bisglycinate, trimethylglycine, etc., on the bottle).

Conclusion

I found my experiment with the carnivore diet to be very interesting and insightful since it helped me to learn a lot about myself and glutamate. While I don’t plan to adopt the carnivore diet, I firmly believe that animal protein is a cornerstone of a healthy diet, offering nutrient density, excellent bioavailability, low toxin content, and easy digestibility.

While I don’t claim to have all the answers, I hope sharing my experiences as a grass-fed beef farmer and nutrition enthusiast sparks a discussion. The potential impact of glutamate causing anxiety and other problems on individuals following the carnivore diet is an important topic to consider. Remember, I’m not a medical expert, so it’s crucial to consult with a healthcare professional before making any significant dietary changes. If you’ve had similar experiences or have insights to share, I welcome your feedback. Let’s engage in this discussion to promote better health and well-being for all.

Carnivore Foods – Glutamic Acid High to Low (grams per 100 calories)*

FoodGlutamic Acid grams per 100 calories
Cod3.57
Turkey – Light Meat3.53
Shrimp3.33
Pollock3.28
Lobster3.18
Blue Crab3.17
Tilapia3.03
Turkey – Dark Meat2.91
Chicken Breast2.89
Beef – Chuck2.70
Brisket2.61
Beef – Top Sirloin2.44
Bison – Ground2.37
Clams2.35
Chicken Thigh2.26
Scallops2.22
Salmon2.13
Cheese – Parmesan2.07
Beef Liver1.92
Duck Breast1.92
Duck – Leg1.90
Ground Beef 90/101.90
Sardines1.78
Beef – Ribeye1.70
Beef – Tbone1.64
Pork Loin1.61
Oysters1.59
Cheese – Mozzarella1.53
Chuck Roast1.50
Ground Beef 70/301.48
Squid1.48
Cheese – Colby1.43
Cheese – Cheddar1.22
Lamb – Leg1.21
Whole Milk1.14
Yogurt1.14
Bacon1.07
Eggs0.88
Beef Brain0.78
Beef Shortribs0.70
Heavy Whipping Cream0.12
Beef Suet0.04
Pork Fat – Leaf0.04
Butter0.00

Non-Carnivore Foods – Glutamic Acid High to Low (grams per 100 calories)*

FoodGlutamic Acid per 100 calories
Asparagus2.66
Tomatoes2.26
Soybeans – Green Raw1.65
Broccoli – Boiled1.59
Mushrooms – White Raw1.42
Spaghetti – Noodles1.35
cabbage1.27
Wheat Flour – White1.17
Sourdough Bread1.17
Beets1.13
okra1.07
carrots1.05
Almonds – Dry Roasted1.03
Pinto Beans1.02
Black Beans1.01
Peas0.97
Oats0.96
Pretzels – Hard0.92
White Bread – Commercial0.90
Squash0.86
Peanuts0.84
Peanuts – Dry Roasted0.84
Walnuts0.83
Kale0.82
Cashews – Raw0.82
Cheerios0.76
Corn – Sweet Canned0.69
Pistachios0.68
Eggplant0.61
Raisin Bran0.52
Potato – Baked0.44
Corn Flakes0.40
White Rice0.37
Froot Loops0.37
Cinnamon Toast Crunch0.36
onion0.34
Ice Cream – Vanilla0.26
Kiwi0.24
Coconut Milk0.24
watermelon0.22
Coconut Meat0.21
Potato Chips0.20
Strawberry0.19
Banana0.19
Avacado0.19
peaches0.17
oranges0.15
Beer0.13
Blueberries0.12
Sweet Cherries0.12
Olives0.06
Raisins0.05
Apple0.00

*These charts should be taken with a few grains of salt. I used the data I could find in publicly available databases and not all databases agreed. However, I think a clear picture is presented of the types of foods which are higher in glutamic acid.

Filed Under: Uncategorized

2 Keys to Healthy Eating

January 24, 2020 by Josiah Leave a Comment

Nutrient Dense Food

There are many different ways of eating that lead to good health results. Weston Price did research on the traditional diets of healthy indigenous and non-industrialized groups of people and he found a wide variety of diets. For example the fat content in some healthy diets was more than double of other healthy diets.

Even though there are many ways to eat healthy, there are 2 keys to healthy eating I want to highlight. I believe every healthy diet should be low in toxins and high in nutrients. This may seem obvious, but it can be difficult to achieve in the modern world.

Eat a Low Toxin Diet

Eating a low toxicity diet is a fairly common concept. It’s the principle behind the push to buy organic foods. It is important to avoid toxins in our diets when we can. However, man-made toxins aren’t the only toxins to avoid. Toxins that occur naturally in plant foods are also something we need to be careful to avoid.

Many cultures ate plants as a part of a healthy diet. These traditional healthy cultures were aware of the dangers of plant toxins and had special ways of preparing plant foods to remove and reduce naturally occurring toxins.

For example, traditional sourdough bread likely resulted in much less toxins from grain. Katherine Czapp explains in this article. “The traditional sourdough process reliably neutralizes the anti-nutrients in the cereal grains as the flour is kept moist and acidic for many hours (or days). Ongoing research in cereal microbiology is investigating some preliminary evidence that the traditional sourdough method may also sever the bonds of the “toxic” peptides in wheat gluten responsible for the celiac reaction and neutralize them as well.”

Eat Nutrient Dense Foods

The second key to healthy eating that is as important or more important than the first, is to eat nutrient dense foods. In addition to avoiding harmful compounds, We should eat foods that contain plenty of compounds our bodies need for health. Nutrient density was one of the commonalities of healthy traditional diets that Weston Price found in his work.

None of us lives a toxin free life, so our bodies must be equipped to deal with and remove toxins. One of the big benefits of a diet rich in nutrition, is that it helps our body access the raw materials to deal with the toxins in our food and environment.

Eating a nutrient dense diet is something that our culture has largely forgotten. We’ve focused on organic and other fancy food labels like cage-free or antibiotic-free. It’s great to avoid the bad, but let’s make sure we also eat food that contains plenty of good nutrition.

It can be difficult to find nutrient dense food. Often the organic versions of foods we find in the grocery store are similar in nutrient content to the non-organic ones. Despite the reduction in chemicals, the production of most organic food is nearly identical to that of non-organic foods and results in food that lacks nutrient density.

How to Improve Your Diet

The basis of your healthy diet, should be prioritizing nutrient dense food.

If you can find food that contains a high level of nutrition, your body will have what it needs to do all the amazing things it does! Your body will also be able to more easily eliminate toxins from your environment and the food you eat. Unfortunately, it can be very difficult to find nutrient dense food in the supermarket.

It’s important to find a local farmer you trust so you can learn how they raise nutrient dense food. I would recommend going to Local Harvest or Eat Wild and looking for farmers near you. Feel free to ask these farmer’s questions about how they are producing nutrient dense food, till you find one you trust.

Secondly, know about the toxins in your food and work to reduce and eliminate them.

Learn which plant foods have naturally occurring toxins and avoid them or learn how to prepare them to reduce the toxins.  Learn to make sourdough bread or how to Lacto-Ferment vegetables.

Talk to your farmer again and ask them how they reduce the toxins in the food they produce. Ask them if they feed their animals with organic or chemical-free feed. Ask about what chemical herbicides, pesticides and fertilizers they use (if any) in their production practices.

I would recommend prioritizing the purchasing of chemical-free or certified organic food in the following way. First meats and animal products, then grains, then vegetables and fruits. We often think of vegetables and fruits when we consider buying organic. However, it is more important to focus on meat and animal products because toxins bioaccumulate higher up the food chain making animal products an important place to start when purchasing chemical-free. Secondly, grains are important to consider purchase organic as the conventional model of producing grains is highly dependent on the use of many toxins. After all, many of our modern grains, like corn and soy, are designed specifically so herbicides can be sprayed on them without killing them. The reasons I would focus on vegetables and fruits last is because many vegetables and fruits and grown without the use of herbicides and pesticides and they also do not bioaccumulate toxins like animals do. It’s best to learn which vegetables and fruits are most problematic and prioritize those when purchasing chemical-free or organic. Checkout the dirty dozen list here.

I hope this article was helpful as you make decisions about purchasing the healthiest food for you and your family. Remember to prioritize nutrient dense food by learning to know your farmer’s practices. Don’t forget about avoiding plant toxins in addition to chemical toxins. These two principles should serve you well. Stay Healthy!

Filed Under: Uncategorized

Next Page »

Copyright ©2026 · Firefly Meadows Farm - All Rights Reserved

Copyright © 2026 · Wellness Pro on Genesis Framework · WordPress · Log in